
My son Brent and his wife Camellia came by to visit a few weeks ago. While Brent was here he made a short video of my model railroad for one of his film projects he is working on this summer. So enjoy the short film by my son Brent he is quite the film maker.
The Train Builder
Tuesday, June 25, 2013
Saturday, January 26, 2013
Scenery starting to take shape
I have been working on getting the scenery further along as well as putting in the final section of benchwork and track.


This is an extension to the existing bench on the right side as you enter the layout. This section is 36"x23" and 43 and 3/4" high. Because there is no wall to attach the bench to it is supported by legs and attached to the last support of the wall mounted section.

Same section as above but from the side. This area will be open from both sides so no backdrop like the rest of the layout

Looking out of the center of the layout at the new section with the lift out section removed for access to the layout when not operating.

Liftout section installed for operation.

This is the elevated sub roadbed for the new section around to the other side which gives an oval around the room.

Lower section of track will be the bottom of the transfer bin at Hope Well when it is built. The upper section is the oval for now but will have the top of the transfer bin also.

Sub roadbed for 36" radius curve of oval over lift out section.
The rest is of the scenery work so far. Most of this area is used geodesic foam from the original layout in Lincoln before we moved to Yuba City.

I cut the used foam and hot glued it in place then filled in sections with sculpt a mold. I added dry powder paint to the sculpt a mold to give it some color as a base.

This section is to the right of the above photo and is more of the same base scenery material. This part of the track is one of the switchbacks that was on the VT&S as it passed Hope Well.

More cut up foam base between track and facia hot glued in place. The gaps will have sculpt a mold filled in to look like rock out cropping's .

Most of the area is ready for painting and final scenery material to complete this part. The sculpt a mold is fun to work with and very easy to carve and shape as you desire as it dries.

Part of this area is geodesic foam and cast satin resin rock forms. The gray rocks in the foreground are part of the foam I allowed for when I was working with the geodesic foam resin. All I did was to allow for some small foam resin to be bubbled up and as it dries it expands to several times it size. The area between the tracks is part cast satin and sculpt a mold as well as foam. This is the tail end of the switchback so the upper section of track is about three inches above the lower track.
Friday, September 28, 2012
Moved?
After driving 30+ miles one way to work everyday we decided to move closer to work. So now we are in Yuba City CA. It's been a process but I am finally getting the benchwork back together after moving from Lincoln to Yuba City. This time I have a smaller space to set up the layout but it's going to work out fine. Over all this space is 10' x 8' and I have lowered the hight of the layout to 45" from 48" which is just right for operating.
 I have built a small room in the garage to put the layout just as I had in Lincoln just this one is two feet narrower so it's a bit more compact as the celling is lower also. I just moved the shelf sections from off the wall and then mounted them back on the walls just as before. Only had a small amount of track damaged in the move but it is fixable as well as putting back the roadbed and track on the far back section where I am presently installing the backdrop.
 Once the backdrop is in place I can get the roadbed and track all back in and be ready to run some trains. The VT&S railroad came to be in 1912 when the smelter was moved from Jerome to Clarkdale to allow for the open pit to be expanded as there was copper ore under the smelter. I don't think moving this layout has been any easier than moving the smelter was a 100 years ago. Can't wait to get it back to where it was so I can get on with scenery and operation of trains.


Wednesday, July 25, 2012
Bridge and Turnouts
Track is almost all installed just need to finish laying the section for the lower track where the transfer bins will be.
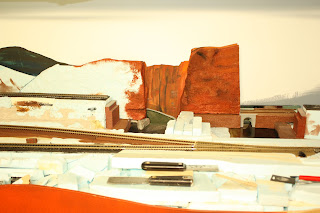
.JPG) Although the VT&S never did get over to the red rocks of Sedona I have taken some artistic liberty and have a section that represents this area. In reality the red rocks were in the distance some sixteen to twenty miles from the VT&S, I have just shortened that distance.
Although the VT&S never did get over to the red rocks of Sedona I have taken some artistic liberty and have a section that represents this area. In reality the red rocks were in the distance some sixteen to twenty miles from the VT&S, I have just shortened that distance.
.JPG) Even though the prototype VT&S didn't have any tunnels I wanted to have one. I have been using sculpt a mold and resin rock castings to make this mountain. Having fun using left over paint to give it a base cote.
Even though the prototype VT&S didn't have any tunnels I wanted to have one. I have been using sculpt a mold and resin rock castings to make this mountain. Having fun using left over paint to give it a base cote.
.JPG) This will be the lower track of the transfer bins at Hopewell. I am having to search for plans of these bins and it's been hard to find any. My limited collection of books only shows two views of the transfer bins and unfortunately they are hard to use for building a scale model of the bins. But hopefully I will be able to get them built one day.
This will be the lower track of the transfer bins at Hopewell. I am having to search for plans of these bins and it's been hard to find any. My limited collection of books only shows two views of the transfer bins and unfortunately they are hard to use for building a scale model of the bins. But hopefully I will be able to get them built one day.
.JPG)
.JPG)
.JPG)
Sunday, June 17, 2012
Artistic Liberty
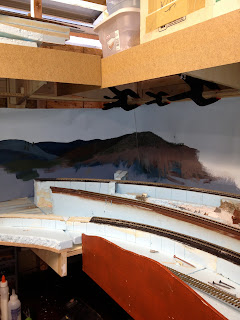
I have been working on the background portion of the layout trying to incorporate the use of a mirror to give some depth to the scene. But after much thought and trying to make it work I have only a very small portion of the mirror being used. But I do have a bit of the red rocks and a canyon with steep walls similar to the grand canyon. So the artistic liberty has come in since the VT&S never did go any where near the red rocks.

Sunday, March 25, 2012
Puzzling until my puzzler is sore.
After giving it some thought over just how to model the Hopewell portion of VT&S I have decided to just do a couple of switchbacks and this will allow for trains to move from one point to the next without having to have a bridge or duck under in the door way.


I am working on using old geodesic foam scenery peaces as part of the scenery as well as painting the backdrop so it will look as mountains in the distance.


Saturday, March 17, 2012
Foam Vinyl and wrong paint?
One of the advantages of using extruded foam board is it's very moldable. I am using the foam board for the base level to allow carving for scenery as well as the sub roadbed for the uphill grade to the Hopewell section. I am using Liquid Nails for Projects to glue the foam board to the benchwork as well as the sub-roadbed for the uphill grade to the Hopewell section. The background has been painted as well. I used Karen's blue denim paint she had for painting an accent wall in or house by mistake. I then had to paint over it with two coats of the light blue paint I had already used for the sky on the original layout. But hey the blue denim has given a good outline for the mountains in the background. I'm lucky Karen is a very understanding wife.
 Here I am using steal weights to hold the foam board in position until the Liquid Nails sets up. I use round toothpicks as nails to also help hold the foam in place. There are two 1" halves of foam board cut at a 2 % grade as well as cut every three to four inches about half way through on the vertical to allow it to bend around the radius of the curves. Once the glue is set I will sand off the top to make it smooth and then glue cork roadbed to the foam board. Then the track will be glued to the cork. I am using the same peaces of foam board from the original incline on this new layout so I will have to sand the top smooth before glueing the cork down to it.
This will be the final curve on the incline which will be five inches above the original level. I have made one circle around the layout to get to grade. From here the transfer bins that were at Hopewell will be the main focal point of the layout. I am very happy so far with how things are progressing.
Subscribe to:
Posts (Atom)